Monday, 19 April 2021

  • Components
             Decorator
             Metadata
  • Cycle Hooks
          ngOnChanges
          ngOnInit 
          ngDoCheck 
             ngAfterContentInit
             ngAfterContentChecked
             ngAfterViewInit 
             ngAfterViewChecked 
  • ngOnDestroy
Description
  • Components are the most basic UI building block of an Angular app.
  • An Angular app contains a tree of Angular components.
  • Angular components are a subset of directives, always associated with a template. Unlike other directives, only one component can be instantiated for a given element in a template.
  • A component must belong to an NgModule in order for it to be available to another component or application. To make it a member of an NgModule, list it in the declarations field of the NgModule metadata.
Components are a logical piece of code for Angular JS application. A Component consists of the following-
Template − This is used to render the view for the application. This contains the HTML that needs to be rendered in the application. This part also includes the binding and directives.

Class − This is like a class defined in any language such as C. This contains properties and methods. This has the code which is used to support the view. It is defined in TypeScript.

Metadata − This has the extra data defined for the Angular class. It is defined with a decorator.

@Component ({
   selector: 'my-app',
   template: ` <div><h1>{{appTitle}}</h1><div>To Tutorials Point</div> </div> `,
})

Option

Description

changeDetection?

The change-detection strategy to use for this component.

viewProviders?

Defines the set of injectable objects that are visible to its view DOM children. See example.

moduleId?

The module ID of the module that contains the component. The component must be able to resolve relative URLs for templates and styles. SystemJS exposes the __moduleName variable within each module. In CommonJS, this can be set to module.id.

templateUrl?

The relative path or absolute URL of a template file for an Angular component. If provided, do not supply an inline template using template.

template?

An inline template for an Angular component. If provided, do not supply a template file using templateUrl.

styleUrls?

One or more relative paths or absolute URLs for files containing CSS stylesheets to use in this component.

styles?

One or more inline CSS stylesheets to use in this component.

animations?

One or more animation trigger() calls, containing state() and transition() definitions. See the Animations guide and animations API documentation.

encapsulation?

An encapsulation policy for the template and CSS styles. One of:

ViewEncapsulation.Emulated: Use shimmed CSS that emulates the native behavior.
ViewEncapsulation.None: Use global CSS without any encapsulation.
ViewEncapsulation.ShadowDom: Use Shadow DOM v1 to encapsulate styles.

interpolation?

Overrides the default interpolation start and end delimiters ({{ and }}).

entryComponents?

A set of components that should be compiled along with this component. For each component listed here, Angular creates a ComponentFactory and stores it in the ComponentFactoryResolver.

preserveWhitespaces?

True to preserve or false to remove potentially superfluous whitespace characters from the compiled template. Whitespace characters are those matching the \s character class in JavaScript regular expressions. Default is false, unless overridden in compiler options.


Following is a description of each lifecycle hook.
ngOnChanges − When the value of a data bound property changes, then this method is called.
ngOnInit − This is called whenever the initialization of the directive/component after Angular first displays the data-bound properties happens.
ngDoCheck − This is for the detection and to act on changes that Angular can't or won't detect on its own.
ngAfterContentInit − This is called in response after Angular projects external content into the component's view.
ngAfterContentChecked − This is called in response after Angular checks the content projected into the component.
ngAfterViewInit − This is called in response after Angular initializes the component's views and child views.
ngAfterViewChecked − This is called in response after Angular checks the component's views and child views.
ngOnDestroy − This is the cleanup phase just before Angular destroys the directive/component.

ngOnChanges – This event executes every time when a value of an input control within the component has been changed. Actually, this event is fired first when a value of a bound property has been changed. It always receives a change data map, containing the current and previous value of the bound property wrapped in a SimpleChange.

import { Component, OnChanges } from '@angular/core';

@Component({
  selector: 'my-app',
  templateUrl: './app.component.html‘,
  styleUrl: ‘ ./app.component.css’
})
export class AppComponent implements OnChanges{
  constructor() {}

  ngOnChange() {
// console.log(“ print on change detections”)
}
}


ngOnInit – This event initializes after Angular first displays the data-bound properties or when the component has been initialized. This event is basically called only after the ngOnChanges()events. This event is mainly used for the initialize data in a component.

import { Component, OnInit } from '@angular/core';

@Component({
  selector: 'my-app',
  templateUrl: './app.component.html‘,
  styleUrl: ‘ ./app.component.css’
})
export class AppComponent implements OnInit {
  constructor() {}

  ngOnInit() {
// console.log(“ print on ngOnInit”)
}
}

ngDoCheck – This event is triggered every time the input properties of a component are checked. We can use this hook method to implement the check with our own logic check. Basically, this method allows us to implement our own custom change detection logic or algorithm for any component.

import { Component, DoCheck} from '@angular/core';

@Component({
  selector: 'my-app',
  templateUrl: './app.component.html‘,
  styleUrl: ‘ ./app.component.css’
})
export class AppComponent implements DoCheck{
  constructor() {}

  ngDoCheck() {
// console.log(“ ngDoCheck”)
}
}


ngAfterContentInit – This lifecycle method is executed when Angular performs any content projection within the component views. This method executes when all the bindings of the component need to be checked for the first time. This event executes just after the ngDoCheck() method. This method is basically linked with the child component initializations.
import { Component, AfterContentInit } from '@angular/core';

@Component({
  selector: 'my-app',
  templateUrl: './app.component.html‘,
  styleUrl: ‘ ./app.component.css’
})
export class AppComponent implements AfterContentInit {
  constructor() {}

 ngAfterContentInit () {
// console.log(“ngAfterContentInit ”)
}
}


ngAfterContentChecked – This lifecycle hook method executes every time the content of the component has been checked by the change detection mechanism of Angular. This method is called after the ngAfterContentInit() method. This method is also called on every subsequent execution of ngDoCheck(). This method is also mainly linked with the child component initializations.

import { Component, AfterContentChecked } from '@angular/core';

@Component({
  selector: 'my-app',
  templateUrl: './app.component.html‘,
  styleUrl: ‘ ./app.component.css’
})
export class AppComponent implements AfterContentChecked {
  constructor() {}

 ngAfterContentChecked () {
// console.log(“ngAfterContentChecked ”)
}
}

ngAfterViewInit – This lifecycle hook method executes when the component’s view has been fully initialized. This method is initialized after Angular initializes the component’s view and child views. It is called after ngAfterContentChecked(). This lifecycle hook method only applies to components.

import { Component, AfterViewInit } from '@angular/core';

@Component({
  selector: 'my-app',
  templateUrl: './app.component.html‘,
  styleUrl: ‘ ./app.component.css’
})
export class AppComponent implements AfterViewInit {
  constructor() {}

 ngAfterViewInit () {
// console.log(“ngAfterViewInit ”)
}
}

ngAfterViewChecked – This method is called after the ngAterViewInit() method. It is executed every time the view of the given component has been checked by the change detection algorithm of Angular. This method executes after every subsequent execution of the ngAfterContentChecked(). This method also executes when any binding of the children directives has been changed. So this method is very useful when the component waits for some value which is coming from its child components.
import { Component, AfterViewChecked } from '@angular/core';

@Component({
  selector: 'my-app',
  templateUrl: './app.component.html‘,
  styleUrl: ‘ ./app.component.css’
})
export class AppComponent implements AfterViewChecked {
  constructor() {}

 ngAfterViewChecked () {
// console.log(“ngAfterViewChecked ”)
}
}

ngOnDestroy – This method will be executed just before Angular destroys the components. This method is very useful for unsubscribing from the observables and detaching the event handlers to avoid memory leaks. Actually, it is called just before the instance of the component is finally destroyed. This method is called just before the component is removed from the DOM.
import { Component, OnDestroy } from '@angular/core';

@Component({
  selector: 'my-app',
  templateUrl: './app.component.html‘,
  styleUrl: ‘ ./app.component.css’
})
export class AppComponent implements OnDestroy {
  constructor() {}

   ngOnDestroy() {
    console.log('Component Destroy');
  }
}


What is Angular CLI ? Angular CLI Commands ? Basic Project structure ? What is Mono Repo Pattern?

What is Angular CLI ? Angular CLI Commands ? Basic Project structure ? What is Mono Repo Pattern?

  • The Angular CLI is a command-line interface tool that you use to initialize, develop, scaffold, and maintain Angular applications directly from a command shell
  • npm install -g @angular/cli
  • Online help is available on the command line
  • ng help 
  • ng generate –help
  • To create, build, and serve a new, basic Angular project on a development server
  • ng new my-first-project 
  • cd my-first-project 
  • ng serve


COMMAND

ALIAS

DESCRIPTION

add


Adds support for an external library to your project.

analytics


Configures the gathering of Angular CLI usage metrics

build

b

Compiles an Angular app into an output directory named dist/ at the given output path. Must be executed from within a workspace directory.

config


Retrieves or sets Angular configuration values in the angular.json file for the workspace.

deploy


Invokes the deploy builder for a specified project or for the default project in the workspace.

doc

d

Opens the official Angular documentation (angular.io) in a browser, and searches for a given keyword.

e2e

e

Builds and serves an Angular app, then runs end-to-end tests using Protractor.

extract-i18n

i18n-extract xi18n

Extracts i18n messages from source code.

generate

g

Generates and/or modifies files based on a schematic.

help


Lists available commands and their short descriptions.

lint

l

Runs linting tools on Angular app code in a given project folder.

new

n

Creates a new workspace and an initial Angular application.

run


Runs an Architect target with an optional custom builder configuration defined in your project.

serve

s

Builds and serves your app, rebuilding on file changes.

test

t

Runs unit tests in a project.

update


Updates your application and its dependencies. See https://update.angular.io/

version

v

Outputs Angular CLI version.


WORKSPACE CONFIG FILES

PURPOSE

angular.json

CLI configuration defaults for all projects in the workspace, including configuration options for build, serve, and test tools that the CLI uses, such as TSLintKarma, and Protractor. For details, see Angular Workspace Configuration.

package.json

Configures npm package dependencies that are available to all projects in the workspace. See npm documentation for the specific format and contents of this file.

package-lock.json

Provides version information for all packages installed into node_modules by the npm client. See npm documentation for details. If you use the yarn client, this file will be yarn.lock instead.

src/

Source files for the root-level application project.

node_modules/

Provides npm packages to the entire workspace. Workspace-wide node_modules dependencies are visible to all projects.

tsconfig.json

The base TypeScript configuration for projects in the workspace. All other configuration files inherit from this base file. For more information, see the Configuration inheritance with extends section of the TypeScript documentation.

tslint.json

Default TSLint configuration for projects in the workspace.

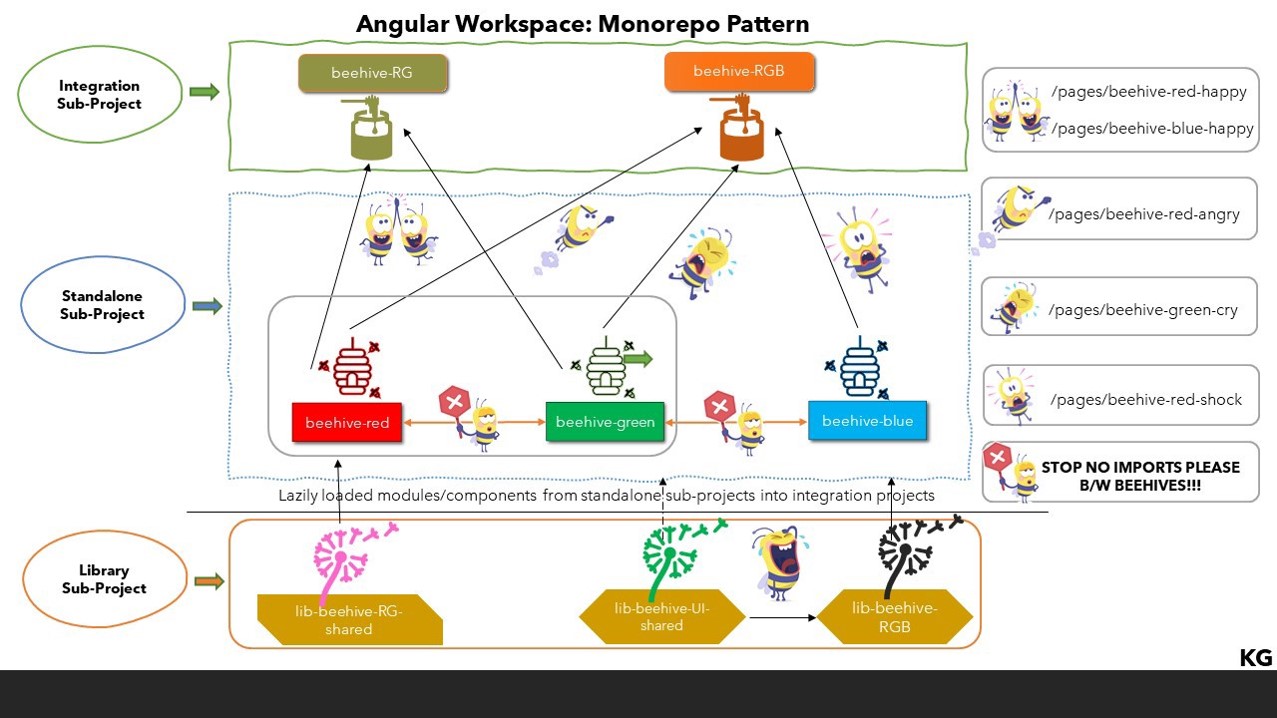
Mono Repo :

  • The Monorepo, as the name suggests mono (single) and repo (repository of the codebase) is a single source of truth for the entire organization code base.


Angular Workspace can be divided into sub-projects which are categorized into:
Standalone Sub-project(s) - These are standalone projects which hold modules/components falling under one set of business functionality or domain. 
Integration Sub-Project(s)- These primarily work as integration project which consolidates bits and pieces from standalone and library projects and serves it as a web-application.
Library Sub-Project(s) - The library sub-projects hold any components/modules/directive/pipes/interceptors that may be used in more than on sub-project or integration project.

What is Angular? Why Angular? Advantages of Angular ? Architecture of Angular Apps ?

What is Angular?

  • A framework for building client application in HTML,CSS, Typescript.
  • It is completely written in typescript
  • It is completely rewrite from the same team that build AngularJS.
  • Primarily aimed to develop  SPAs
  • It uses HTML syntax to express your application’s component clearly
  • It is designed for web ,desktop and mobile platform
  • Developed By Google in September 2014
Building Blocks?

  • Component
  • Modules
  • Templates
  • Metadata
  • Services
Why Angular?

  • Modular approach
  • Reusable code
  • Development quicker and easier
  • Unit testable
Advantages of Angular  :

  • Reduction of cost
  • Standards compliance
        ES6+
        Modules
  • Performance
  • Open Source
  • Popularity
  • Document
Angular History 

  • AngularJS – Build on JavaScript and completely based on controllers
  • Angular 2 –Incorporated the component based approach 
  • Angular 4-Included router updation, Angular CLI 1.0 was introduced 
  • Angular 5,6 – Angular CLI was optimized and the commands ng-update and ng-add were added
  • Angular 7- Prompts were introduced which provide tips in CLI about the functions.
  • Angular 8 – Ivy renderer and Bazel were introduced 
  • Angular 9 – Came with better framework and Angular Material included full switch to Ivy Renderer as a default compiler

  Architecture


What is/are service(s)

Services & DI (in aspect of angular)
  • What is service?
  • Why we need?
  • How to use service in angular?
  • What is DI (Dependency Injection)
  • What is Injector in Angular Services 
  • Hands On Services & DI
  • More on Angular Services (How they actually works)
A plain type script class for well-defined purpose that’s it, nothing else.

Export class EmployeeeService{

constructor (){

        }
}

Why Services?

  • DRY
  • Separation of concerns
  • To Increase modularity & reusability 
  • https://angular.io/guide/architecture-services - Angular docs also ask for same

How to use services in Angular?

  • Create a service class (best to use Robot )
  • Register service with angular (Injector).
  • Inject/use service using (Dependency Injection )

Dependency Injection

  • Code without DI - Drawbacks
  • DI as Design Pattern
  • DI as Framework in context of Angular
Code without  DI - Drawbacks


DI as Design Pattern
  • DI is a coding pattern in which a class receives it dependencies from external sources rather than creating it from itself

DI as Design Pattern Cont.


Dependency Injection as Framework using Injector

  • Injector is nothing but just like a container in angular framework which keeps track or list of all dependencies.
  • When any components or elements would required any dependency then injector is responsible to provide that dependency at the time of initialization.


Let’s get back to hands on Services
  • Create a service class (best to use robot) - done
  • Register service with angular (Injector). - done
  • Inject/use service using (Dependency Injection )


More on Services : Ways of Registering services 

Module Injector
  • With-in provider section of @NgModule decorator 
  • Using @Injectable decorator with meta data 


Element Injector
  • created implicitly at each DOM element (@Component, @Directive)

Note : Registration of services in angular follows the hierarchy system and it would be responsibility of  Injector (by whom it can be injected & by whom can be not). 

Register at Child component level


Register at Parent component level


Register at module/root level


More on Services : ‘root’ || ‘platform’ || any


More on Services : Deep Dive


  • Which one is better Module Injector (@NgModule or @Injectable)
  • @Injectable annotation (what else this annotation do apart from registration)
  • Is Angular services are Singleton?  
  • What is Sandboxing ?


Friday, 19 March 2021

What are Pipes ? Default Pipes? Custom Pipes?

A pipe is a way to write display-value transformations that you can declare in your HTML. It takes in data as input and transforms it to a desired output.

Please note – Pipe only change the display value and not the real time values , they remain as it is.

Use Case : Alter Date format in display or make a text uppercase

Angular provides number of default pipes which suffices many of the requirements.

Exhaustive list is present at https://angular.io/api/common#pipes.

How to use : 

To apply a pipe, use the pipe operator (|) within a template expression as shown in the following code example, along with the name of the pipe. Also ,we can pass multiple parameters by using colon.

Few Examples : 

<p>{{ 'angular' | uppercase }}</p>   //ANGULAR
<p>{{ 0.123456 | percent }}</p>  // 12%

@Pipe({
name: 'truncateText'
})

<span>
{{longString | truncateText : 12 : 18}}
</span>

transform(value: string, startLen , endLen): unknown {
return `${value.substr(startLen,endLen)}...`;
}


Few words about ng-container

It allows us to create a division or section in a template without introducing a new HTML element.

It is not render in the DOM, but content inside it is rendered.

It is just a syntax element , which is rendered as a comment.

Custom Directives

@Directive({
selector: '[appHoverEffect]'
})

<tr *ngFor="let employee of employees;let i =index;" appHoverEffect [mouseEnterColor]="'gray'">

constructor(private _el : ElementRef) { }
@Input() mouseEnterColor : string;
@HostListener('mouseenter') onMouseEnter() {
this.hoverEffect(this.mouseEnterColor);
}
private hoverEffect(color){
this._el.nativeElement.style.backgroundColor = color;
}

Peculiar use case

Use case - Sometimes , there occurs a need where in we need to use two structural directives simultaneously. We need to hide and show a grid and within the grid we want to iterate over the list.

Alert Point!!!!!.....We can’t use two structural directives in the same DOM element.

Solution :

Not so elegant solution – Use two different HTML tag , one with ngIf and other with ngFor. Unnecessary Dom addition , which can affect the layout.

Elegant Solution – use ng-container

Built in Structural Directives

*ngIf - ngIf is used to display or hide the DOM Element based on the expression value assigned to it. The expression value may be either true or false.

*ngIf-else - ngIf-else works like a simple If-else statement, wherein if the condition is true then ‘If’ DOM element is rendered, else the other DOM Element is rendered. Angular uses ng-template with element selector in order to display the else section on DOM.

*ngFor - *ngFor is used to loop through the dynamic lists in the DOM. Simply, it is used to build data presentation lists and tables in HTML DOM.

*ngSwitch - ngSwitch is used to choose between multiple case statements defined by the expressions inside the *ngSwitchCase and display on the DOM Element according to that. If no expression is matched, the default case DOM Element is displayed. 

Structural Directive

These are responsible for rendering the HTML layout.

Structural directives shape or reshape the DOM’ structure typically by adding, removing, or manipulating elements.

Identifier for a structural directives are (*). The asterisk is actually short for ng-template with the attribute passed in.

Built-in Attribute Directive

NgClass - add or remove multiple CSS classes simultaneously based on condition within ngClass.

NgStyle – used to set multiple inline styles simultaneously, based on the state of the component.

NgModel—adds two-way data binding to an HTML form element.